This May, Microsoft launched several new important features to the University of Toronto’s Teams environment. These updates cover new features such as background effects, downloadable attendance lists and a larger nine-person video grid.
Providing value to both staff and faculty, this array of Microsoft Teams updates will enhance the video conferencing experiences of U of T’s community of Teams users. Please review this article for a summary of five of these important new Teams features (and how to use them).
1. You can now ‘raise your hand’ in Teams meetings
As of last week, you can now raise your hand in Teams meetings. Raising your hand is a great option for when you want to let others in the meeting know that you want to speak.
To raise your hand, simply click on the hand icon in your meeting taskbar. A notification that your hand is raised will appear on your icon and in the list of meeting attendees. To lower your hand, just click on the hand icon a second time.
![]()
2. Teams now offers a nine-person video grid
During Teams meetings, users are now able to view up to nine video streams at once on a 3×3 grid. Previously users could only view up to four video streams at once. Microsoft is currently working on plans to increase this number to accommodate even more video streams.

3. Taking attendance in Teams meetings
Teams has made it easier to track meeting attendance with the release of downloadable attendance lists. This means that Teams meeting organizers can download a spreadsheet at any point during the meeting that lists the meeting participants.
The attendance list can only be downloaded by the meeting organizer while the meeting is in session. To access the list, follow these steps:
1. Click on the people tab in your meeting taskbar to bring up the list of meeting participants.
![]()
2. At the top of the People list you will see an arrow icon. When you hover over the icon with your mouse you will see the option to Download attendance list.
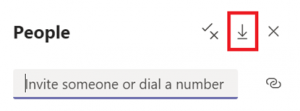
3. Click on the icon. This will initiate a download of the meeting attendance list.
4. Go to the Downloads folder on your computer. You will see an Excel file titled meetingAttendanceList.
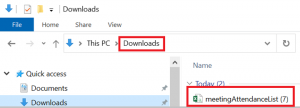
5. Double click on the file to open it and view your list of meeting participants. The list will also include the time that each participant joined and left the meeting.
4. Access your meeting options directly from inside your meeting
Microsoft has added a simple shortcut that allows organizers to easily access meeting options when the meeting is already in progress. To access your meeting options during a meeting, just click on the check-mark icon at the top of the People menu.
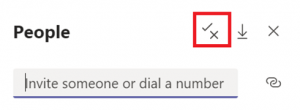
This will open the meeting options menu in a new browser tab.
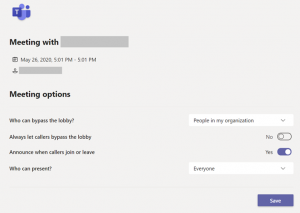
To learn more about using the meeting options menu, please review these knowledge base articles on meeting roles and lobby settings.
5. End the meeting for all attendees
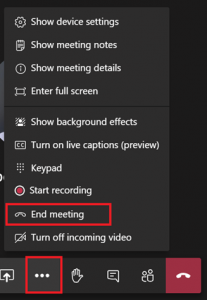
Sometimes you will want to choose exactly when your meeting will end and ensure that everyone leaves the meeting at the same time. Teams has introduced a new ‘end meeting’ function for exactly this purpose. When the meeting organizer is ready to end the meeting, they can simply click on the three dot taskbar menu and select End meeting. This action will end the meeting for all participants at the same time.
Interested in learning more about Teams?
For a list of additional new Teams features and updates, please see this announcement from Microsoft.
Visit EASI’s Connect+Learn page for a list of upcoming Teams training sessions. You can also subscribe to the Connect+Learn newsletter for updates, and view slides and recordings from previous presentations.

