
University of Toronto (U of T) staff and faculty members have taken the transition to remote work in stride, with many in the U of T community using cloud-based productivity applications like OneDrive and SharePoint for the first time. Using Microsoft Teams for meetings and collaboration has also become the norm, with a combined 2,382 meetings and calls taking place between colleagues over the month of March alone.
As Teams use has increased, so has the comfort level of individuals who use this tool in their day-to-day work lives. EASI’s Digital Workplace support staff will continue to provide support through online training, resources and documentation. Here are five tips and tricks from EASI’s Digital Workplace for regular Teams users.
Tip #1. You can test your devices
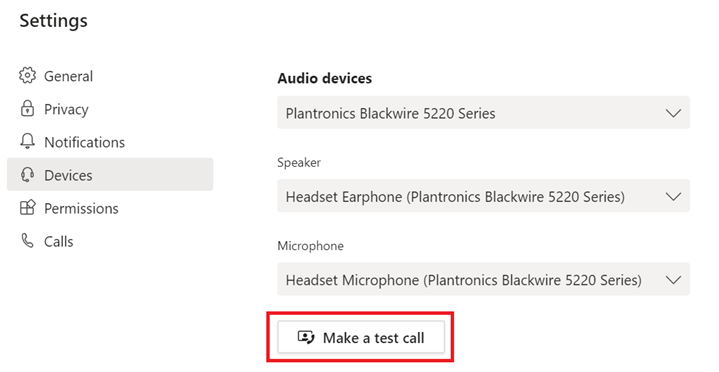
If you are using a new audio or video set-up, you can test your devices within Teams to ensure they are working properly by making a test call. To do this, simply click on your user icon in the top right corner of Teams and go to Settings.

When you open your settings, click on Devices and then Make a test call.
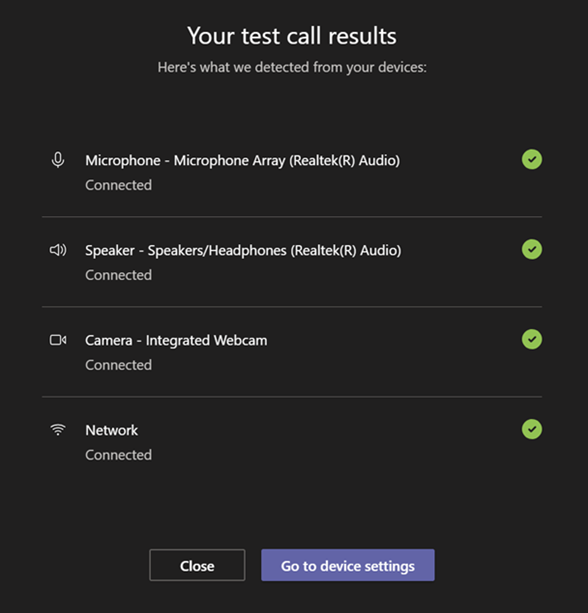
This will initiate a call with Teams Echo, the test call bot. During this call you can see if your video is enabled and can record a message to test the call quality. Once the call is complete, Teams will generate a report that lets you know how your microphone, speaker, video and internet connection performed.
Tip #2. Change your status to disable Teams notifications during presentations
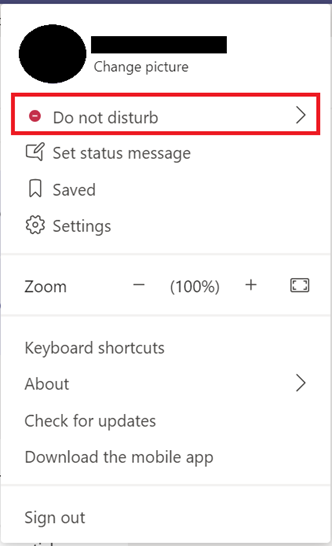
If you are presenting your screen on Teams and need an environment free from notifications, you can disable them with the click of a button by changing your status to Do not disturb. This means that you will only get notifications from priority contacts.
To enable the Do not disturb status, click on your user icon in the top right corner of Teams and select Do not disturb. Remember to turn it off when you are ready to receive notifications again!
Tip #3. Upload a PowerPoint presentation directly to Teams to present with others
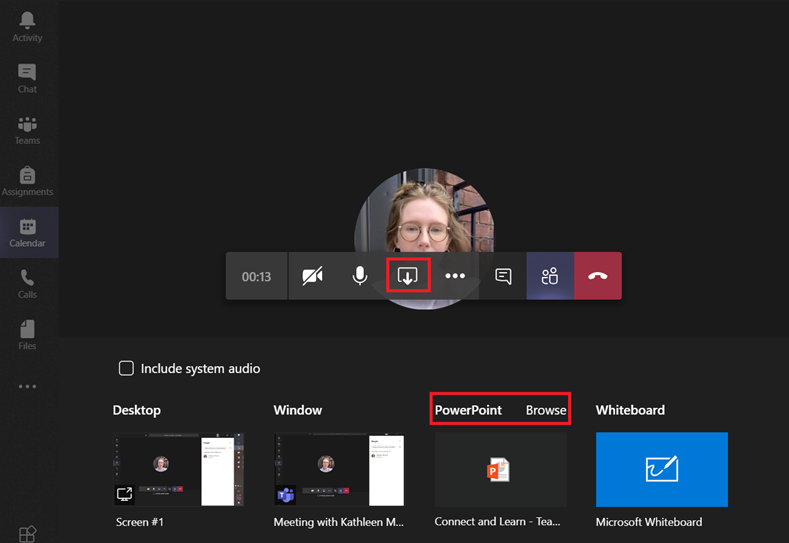
If you are presenting a slide deck with other presenters, you can upload it directly to Teams instead of sharing your screen. This option allows other presenters to navigate through the deck for their part of the presentation.
To add a PowerPoint deck to the meeting, click on the screen sharing button. You will see a column labeled PowerPoint. To find the presentation you want to present on your computer, click Browse.
Once you have selected your slide deck, Teams will upload it to the meeting so that everyone can view it. You will see a menu with arrow buttons that let you navigate the slide deck. Presentation attendees can also use the arrows to move through the presentation at their own pace (unless you disable it by clicking the eye icon).

Other presenters can also request to take over the presentation navigation when it is their turn by clicking Request control. You can also assign control to a presenter by clicking Give control.
When the presentation is over, simply click the screen sharing button again to stop sharing the presentation. Please note that this feature is only available via the Teams desktop app.
Tip #4. Share your system audio
Sometimes when you are presenting, you need to share audio with your meeting attendees: maybe you have video or sound embedded in a PowerPoint presentation. When you share audio during your meeting, you want to make sure that you are not sending the audio through your computer’s microphone. Instead, you want to share your system audio directly to meeting attendees.
To share your system audio when you are screen sharing or presenting, click Include system audio before you start sharing your screen or upload your slide deck.
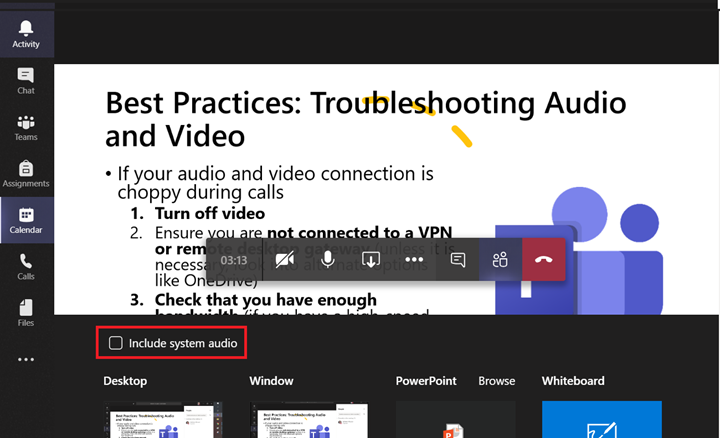
This will ensure that high quality audio will be delivered during your presentation or meeting.
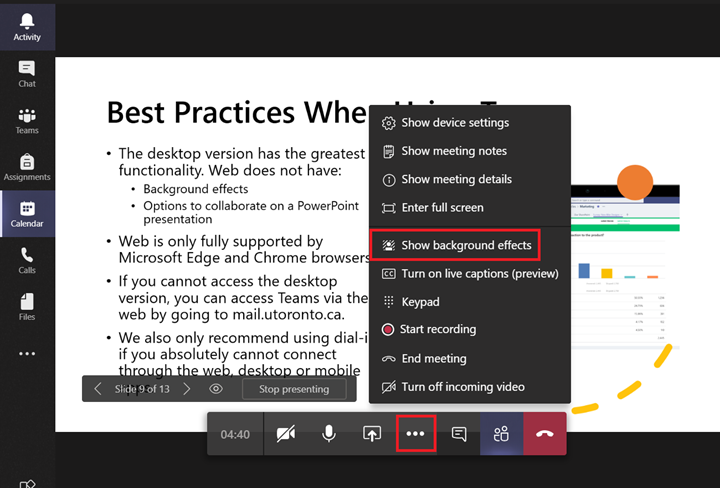
Tip #5. Change your background when video is enabled
When you are in a Teams video call and you prefer to keep your surroundings private, you can enable background effects. This lets you choose the background that appears to others in your call; it will still show your face, but your background will be what you select.
To enable background effects during a call, click on the three dot menu and select Show background effects.
You will see several backgrounds to choose from. Select the background of your choice by clicking on it. When you are ready to apply it, click Apply. If your video is not on yet, click Apply and turn on video.
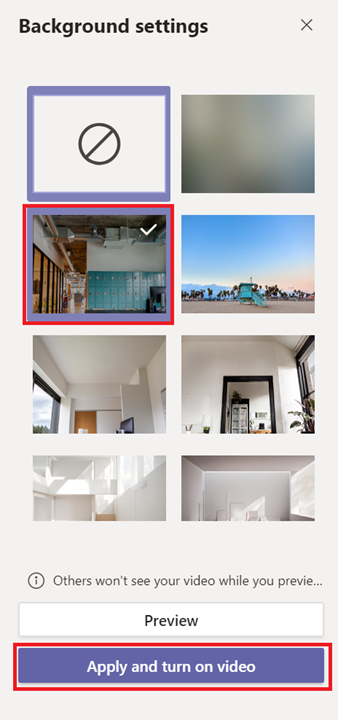
Your background will be applied. Please note that this feature is only available to Teams desktop users, and that computers must meet certain graphics requirements.
Interested in learning more about Teams?
Visit EASI’s Connect+Learn page for a list of upcoming training sessions. You can also subscribe to the Connect+Learn newsletter for updates, and view slides and recordings from previous presentations.